Do you want to build a snowman? (Quick, what movie is that line from?) Real snowmen are a lot of fun to build, but it’s a little sad putting so much work into something that’s destined to melt. A button snowman? With the help of quick dry tacky glue, he’s in it for the long haul.
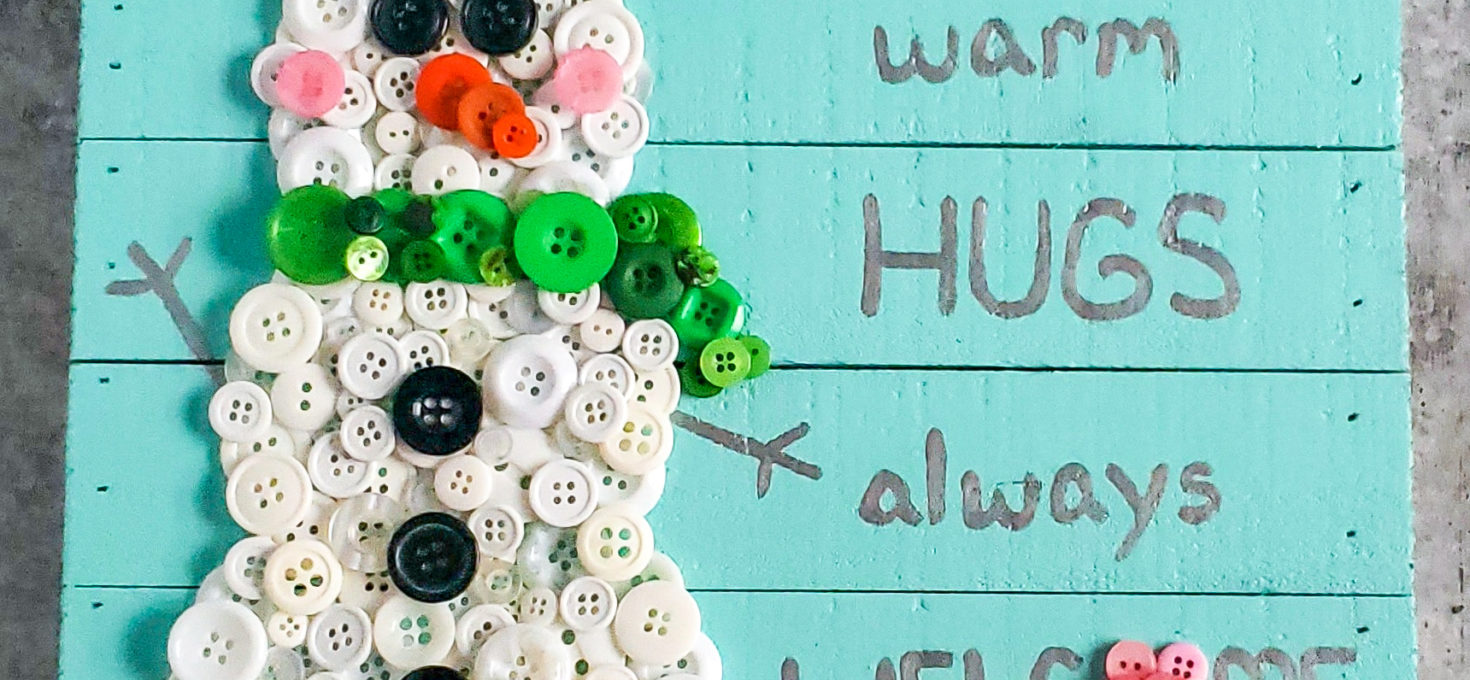
This project is a little time-consuming but completely worth it. Isn’t he adorable?? I named him Fred.
I decided to write “warm hugs always welcome” on my snowman sign. Your sign can say whatever you want!
(This post contains affiliate links. I may receive a small commission, at no cost to you, if you make a purchase through a link. My full affiliate disclosure and privacy policy is available here.)
What You’ll Need:
12 x 12 inch wooden plank that hangs (if you want to hang it up)
sandpaper
blue spray paint
silver paint (I used fabric paint)
thin paintbrush
175-200 assorted white buttons
40-50 assorted black buttons
20-25 assorted green buttons
10-15 assorted pink buttons
3-5 assorted orange buttons
quick dry tacky glue
3 round objects of varying sizes, like lids
a pencil
The main reason this project is time-consuming is because of drying time. I recommend working on your snowman over the course of several days.
The first step is sanding your board until it’s smooth. Then spray paint the board. I did five coats to achieve this color. You can use a light blue like I did or any color that you want. I just browsed Michael’s until I found the color I wanted.
Once the board is dry, use three round items of varying sizes (like lids or cookie cutters) to trace a snowman. Then freehand a top hat.
Now you can start gluing the buttons. Start by gluing one layer of white buttons and black buttons for the hat, using a few dots of glue on each button. Let this layer dry before gluing any buttons on top. But ultimately you can do another layer or two of white and black buttons to cover any gaps in the first layer.
Once you’re happy with the base of the snowman add the eyes, nose, cheeks, buttons and scarf. I used three overlapping buttons of descending size for the nose, and I used two layers of buttons for the scarf.
When the snowman is dry use a pencil to write your phrase on the other side of the board. If there’s an “O” in any of your words you can replace it with a heart made out of buttons. You can print out letters to trace or freehand it like I did. Next, use a thin paintbrush to trace the letters with paint. You could also use a permanent marker. Let the paint dry before gluing on your button heart. Finally, use the paint or a permanent marker to draw arms for the snowman.
I’ve made other button art projects before, and so far I’ve never had a button fall off (knock on wood). Store him carefully and he’ll never “melt.” But if a button does fall off, you can always re-glue it.
Tag me @rosesandwhiskers on Instagram if you make it and use the hashtag #rosesandwhiskers. He would also make a cute gift!
Happy crafting! 🙂


